Wooden house – Common room
Trusses
Because obtaining boards with a full length of the truss (this is true for his waistband) is difficult to achieve, given below is a method of making a truss from two segments of appropriately shorter boards. The structure of such a truss is shown in the drawing.
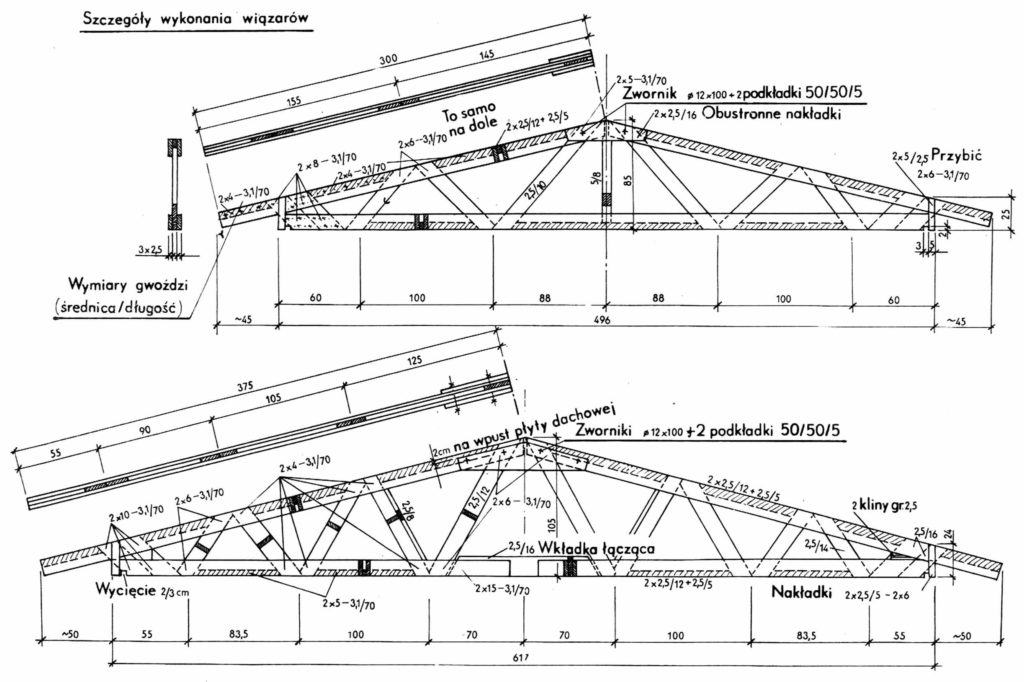
Length trusses 5 i 6 cm. The exact span of the truss must be corrected according to the dimensions of the plates and corner pillars.
The proposed solution requires special care when making connections and maintaining the given dimensions, as it has a decisive influence on the strength of the connections. The girders shown in the drawing have been calculated for the load 200 kG/mJ. A template is required to prepare the truss segments. The segments made according to the template are then joined together with overlays when mounting the trusses on the site. The template is usually prepared in the open air. We make it in the form of a floor in the shape and size corresponding to the external dimensions of the truss segment. These dimensions are determined by hammering the pegs into the ground along the circumference of the template, and the location of the internal bars (concentrations) we cross out on the floor. Then place the boards along the perimeter of the template, which constitute the belts of the lower and upper segment, we cut them as needed and put the internal bars according to the drawing drawn on the floor. The last step is to assemble the arranged elements into the whole segment.
Foundation
It is common practice with us, that summer cottages and other simple structures are built on solid continuous stone foundations, concrete or brick. Such foundations are usually oversized. They significantly irritate the entire structure and cause material waste, however, it is not compensated by an increase in the use value of the structure, because even the possible basement with this method of foundation is usually not used, and a space of the same size could be obtained much cheaper.
In most recreational facilities, a basement is completely unnecessary, a simple, light structure is sufficient here as a foundation. Such a structure, at the same time fully meeting the requirements in terms of strength, they are point piles, sunk below ground frost, i.e.. usually 70 cm.
Below is the method of placing such piles in the ground. It is fast, cheap and easy to implement on your own. This method is applicable in the presence of ordinary soil, i.e.. soil of average cohesion. In the case of rocky ground, there is no need for embedded piles, then it is enough to place the building on low concrete pillars set directly on the rock. In ordinary ground, with a load capacity of approx. 4 kG/cmJ, we drill holes with a depth 70 cm using a ø24 cm hand drill, which we can make by hand from a steel plate with a thickness 3 mm and steel tube. This tube is attached to the disc by welding, and at the top there is a handle that acts as a lever.
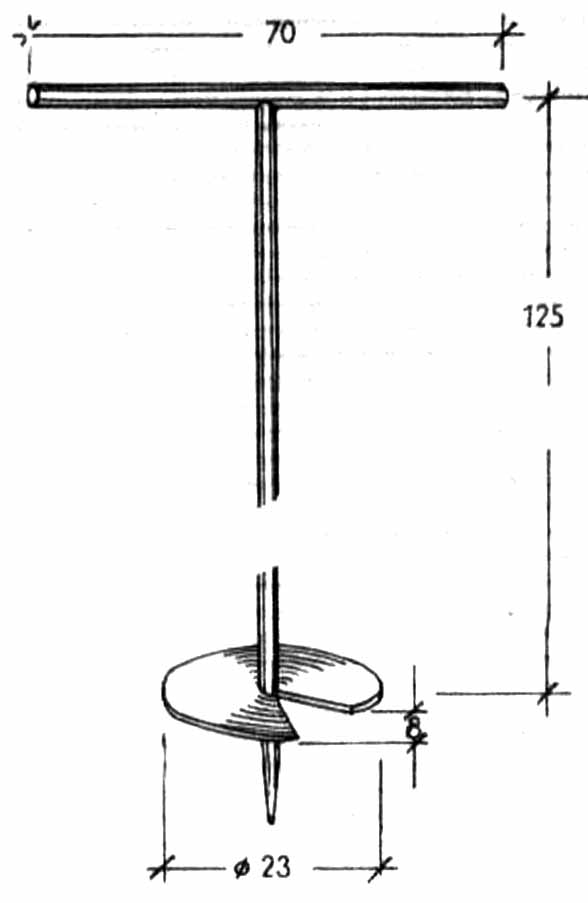
Hand drill
After making a few turns with the drill in the ground, pull out the ground pillar set on it and shake it off the hole. Where the ground is not compacted, you have to shake it off with one revolution of the drill bit. Drilling a hole depth 70 cm takes approx 5 do 10 minutes. If a large stone is found while drilling, you have to smash it with a steel pickaxe or a pole. When it is not possible to prepare or purchase a drill or the number of holes is small, you can dig holes with a shovel.
A ø20 cm paper tube is placed in the drilled hole, he compacts the soil previously thrown outside around it, and inside the pipe he pours concrete mix up to approx. 1/3 pipe height. Then the tube is pulled out a little, so that a concrete foot is created under it, then another portion of the mixture is poured into the pipe and the pipe is pulled up. The pipe takes so long, until its upper edge is at the height specified in the project and marked in the area with a stretched wire. Then the concrete mix is filled up to the height 10 cm below the top edge of the pipe. The mixture is whipped several times with a stick and allowed to harden. This is how all other piles are made. After two or three days, batten longitudinal members of the floor frame are placed on the piles (or thicker boards), acting as a foundation.
Stringers must be level. Where some of the piles are lower than others, wooden wedges are placed under the stringers based on these piles. After leveling the stringer, bolts are screwed to its side, the lower part is concreted in the upper part, unfilled concrete, pipe section. When concreting the anchor, the pipe is filled with concrete mix up to the bottom of the stringer.
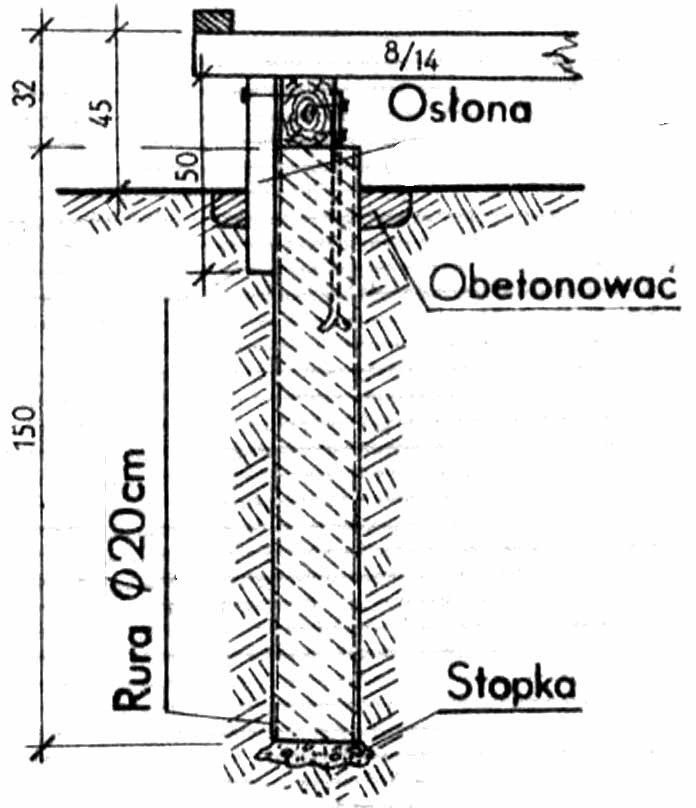
Pile cross-section
The number and spacing of piles depend on the load-bearing capacity of the soil, longitudinal bending strength and the expected load on the floor. Under normal load and normal bearing capacity and longitudinal cross-section approx. 14/18 cm, it is enough to place the piles at a distance of approx. 2 m one from the other.
After fixing, floor joists made of square timber with a cross-section are placed transversely on them longitudinally 8/14 cm and, after checking their position, they are nailed longitudinally. The distance between the individual floor joists is approx. 50 cm. The joists, before nailing them to lengthwise, are supplied with laths on both sides, on which the fibreboards will then be placed (be boards) and isolation.
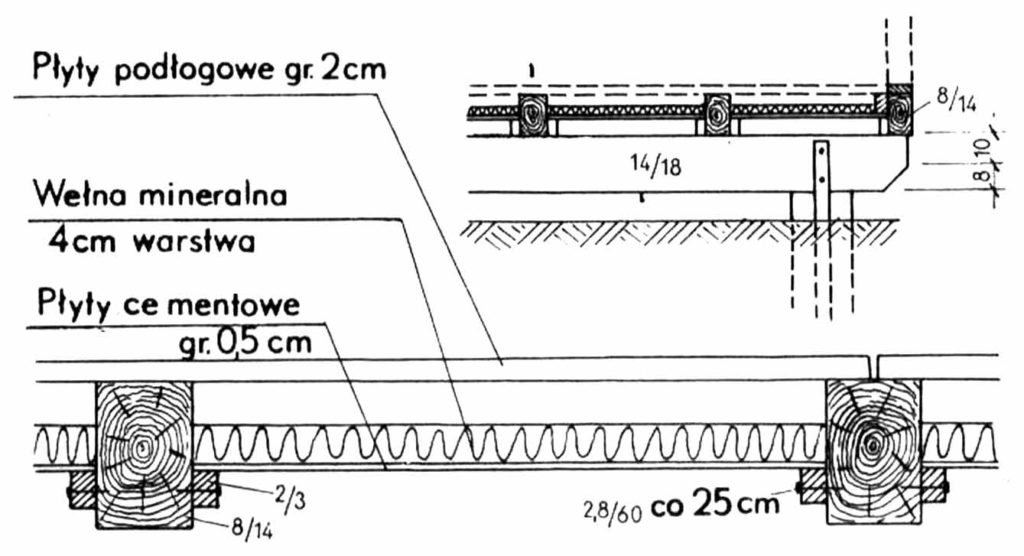
The cross-section of the floor
The entire structure can be covered with an impregnating agent (fungicidal), although it is not necessary, as the space under the floor is sufficiently ventilated and the wood remains dry. On the joists prepared in this way, we lay a floor made of thick boards 25 mm, nailed to the joists with nails. Remember to leave holes in the floor for sewage pipes, water pipes, cellar hatch, etc..