Wooden house – Common room
MEASUREMENT
The measurements come down to determining the outline of the walls of the building in the field. We start the measurement with the determination, according to plan, front wall axis and in places, where piles are provided, we hammer the pegs. The next step is to determine the axis of the gable walls (transverse), which should form exactly a right angle with the axis of the front wall. To make this task easier, we make a rectangular triangle from the boards, one side of which is exactly 3 m, other 4 m, a hypotenuse 5 m. With the help of this triangle, you can easily delineate the axes of the remaining walls of the object. Then inside the delineated rectangle (in the case of a more complex shape of the horizontal projection of the object – inside a few rectangles) we set (we measure) points as planned, in which the piles are to be driven, and pegs are also hammered in at these points. Right angles are checked by measuring the diagonals of the delineated rectangle. The actual length of the diagonals need not be calculated, it is enough to compare the lengths of both diagonals of the rectangle – they should be identical (a discrepancy of a few centimeters is permissible).
EXECUTION OF INDIVIDUAL ELEMENTS OF THE BUILDING
Wall plates
So that the individual boards have exactly the same dimensions, it is desirable to draw up a template, according to which the boards will be assembled. A platform with an even surface, assembled on a rigid base, can serve as a template (the goats) On the height 60 do 80 cm above the ground. Strips defining the exact size of the board are permanently screwed on the edges of the template, i.e.. its width and height.
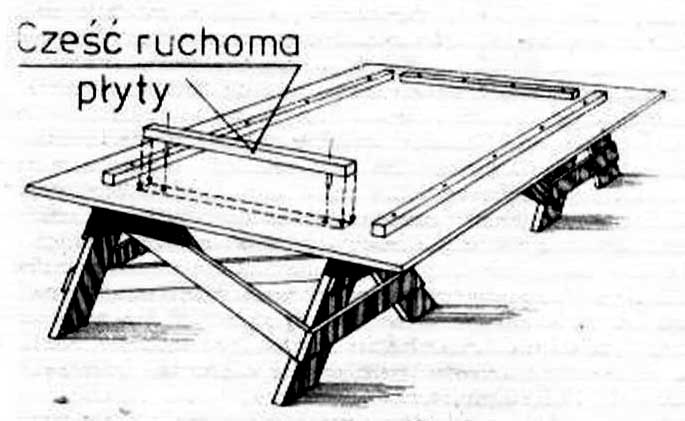
Template for making plates
Please note, that the frame of the plate must be at the top and bottom o 5 cm shorter than the plate itself, during assembly, we place the boards on a height patch 5 cm, arranged along the walls, and at the top we connect them with the same patch. Therefore, when nailing the material constituting the outer sheathing of the board to the frame, we fix the frame in the template, butted from above, at the bottom, insert the thickness insert into the template 5 cm. As the frame is rotated to nail the material constituting the skin, the inserts are removed.
The selection of material for the panel frame is of great importance for the durability of the walls. The patches intended for this purpose should be of soft wood and if possible, make complete, not joined pieces. The wood should be properly dry and undistorted.
Patches do not have to be identical (they can be of different width) cross section, because only the external dimensions of the frame are important here, i.e.. length and thickness. The length you need – it is not required for shorter lengths of battens – can be obtained by piecing together two lengths of battens. Too thick patches must be cut, if you don't have your own circular saw. Then, in the battens intended for the vertical frame posts, cut a longitudinal deep groove from the inside. ok. 20 mm i wed. 4 do 6 mm.

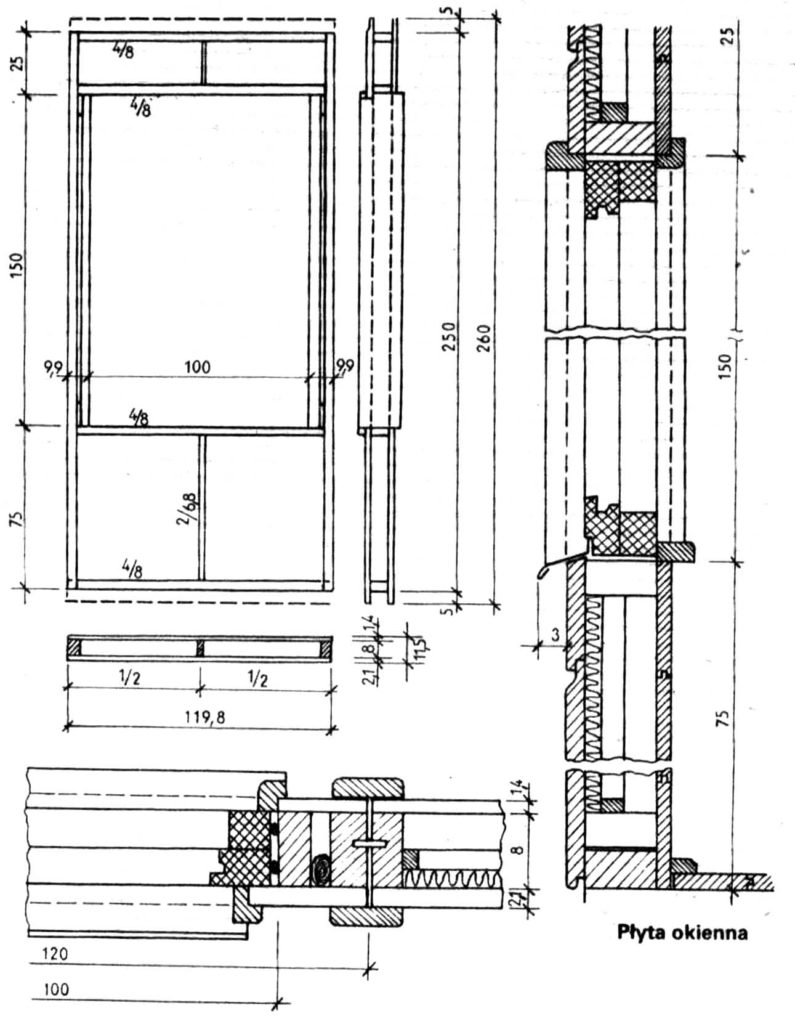
Wall plate. When using tongue and groove boards for the outer sheathing and fibreboards under the inner sheathing, there is no need to use additional insulation inside the frames. The dimensions given in the drawing should be adapted to the material available.
The groove should be positioned exactly in the middle of the batten yes, so that during assembly the individual boards can be connected using the so-called. feathers, made of a strip of fibreboard or a thin wooden lath. It is not necessary to connect the frame elements at the corners with carpentry joints (on the groove or on the overlay), just nail them down. The frame prepared in this way is placed in the template, the frame is covered with insulation made of non-sanded roofing felt or plastic foil and the previously prepared outer sheathing is nailed to the frame. The frame then rotates, puts insulating material in it (thermal isolation), and if necessary – double its layer, and nails the board sheathing to the frame from the inside (from the side of the room). When nailing the sheathing, do so from the inside, as well as from the outside, it is necessary to take care of its aesthetic appearance and maintaining exact dimensions. Means, that e.g.. when used for the outer sheathing of boards, they must be of equal width, and the nails will be hammered exactly one after the other in a line and possibly close to the edge of the board, so that they can be hidden under the laths nailed later at the board joints. From the top and bottom of the board, the sheathing should protrude beyond the frame 50 mm, because when mounting the walls, the frame is placed, as already mentioned above, on the height patch 50 mm and with a width corresponding to the width of the panel frame. The same patch is connected when mounting the plate at the top, yes, that it creates a wreath that strengthens the wall.
When making boards, in which windows or doors are to be embedded, it's necessary to, when breaking the frame, install the frames into the boards for these openings.
Window plate
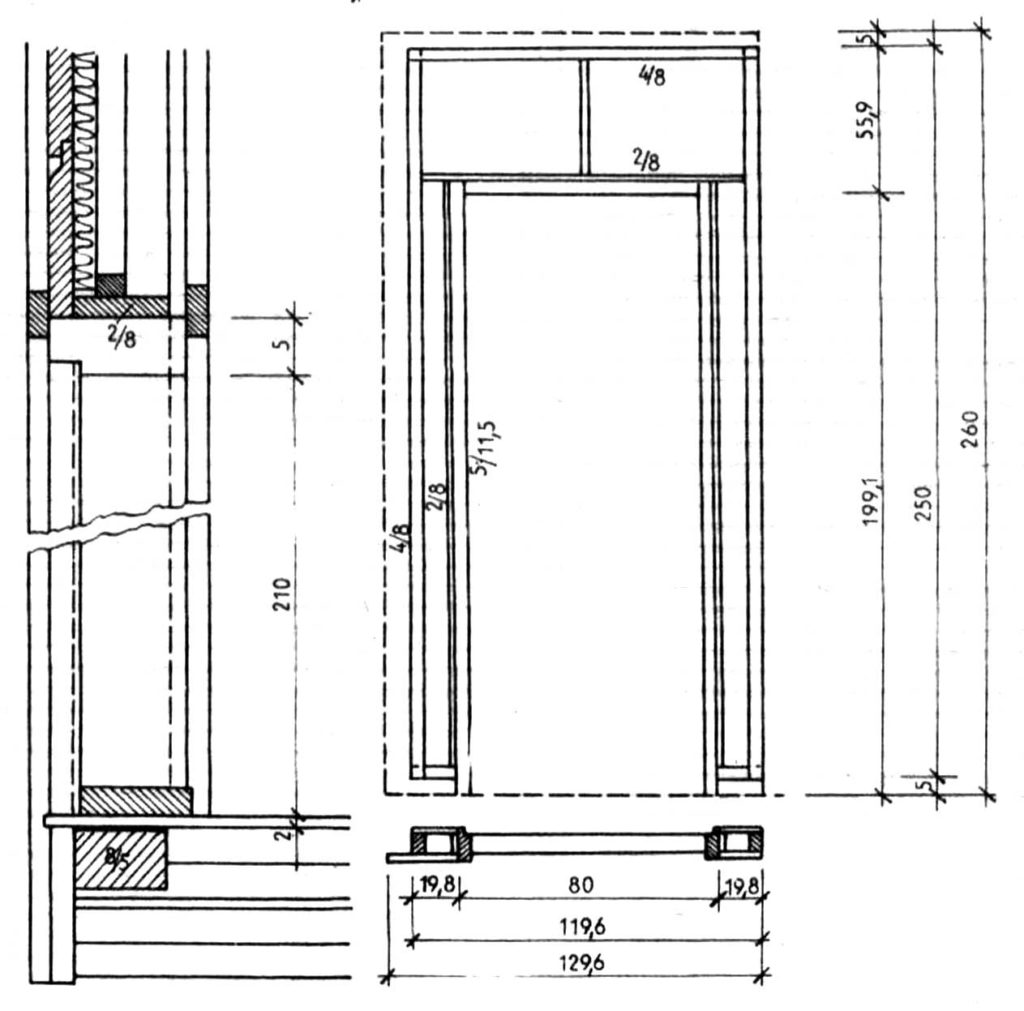
The door leaf
Frame dimensions, especially their thickness, should be adapted to the thickness of the frame. The drawings show panels with typical windows and doors inserted. In the case of atypical windows and doors, the way of inserting and fixing them will be the same. The finished boards are stacked or placed standing.