Kitchen table for… Ironing
Kitchen table for… Ironing
Ironing has never been a favorite activity of housewives, even in times, when the kitchens were large, Bright, warm and ergonomically laid out. So to make it easier to iron shirts, tablecloths or cloths, it is worth equipping your own kitchen with the right equipment, which, in addition to fulfilling the role of an ironing board, would be used as a kitchen table for various purposes.
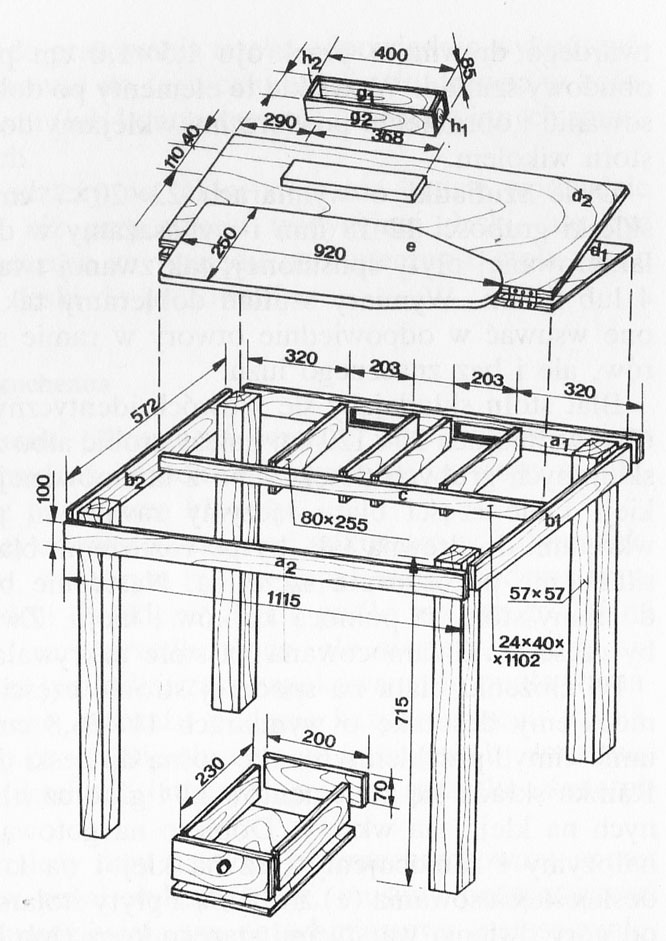
The figure shows a table, whose design was so conceived, so that the table top can be cut in half the width, connect both parts with hinges, one of them fixed permanently to the supporting frame, and the second one opened, equip from the bottom with a typical, soft ironing board length 92 cm. Under the table top part, fixed to the frame permanently, there is still enough space for two small drawers. We start the construction of the table with the preparation of four posts for the legs. Virtually any wood is suitable for this purpose, provided, that it will be well dried and knotless. The cross-section of the bars should be 60×60 mm, which, after planing, will give us the cross-section 57 required in the structure×57 mm. The length of the table legs should be approx 71,5 cm.
Then we make elements of the support frame consisting of a1 slats, a2, b1 i b2. Planks with a thickness of approx 20 mm or blockboard (it can be a chipboard veneered with wood or unilam). Let us pay attention, to keep the wood dry, because wet boards will warp in such a short time, that they will prevent the use of the table, and in the extreme case they will lead to the destruction of the structure. Strips a1 and a2 should have a length 115 cm, b1 and b2 strips -7,2 cm, and the width of the slats must be at least 10 cm (you can give wider slats, which will both strengthen the stiffness of the structure, and it will also enable the production of deeper drawers).
Cut two rectangular holes with a cross-section of 20.3 in the a1 strip×7 cm, where we will put the drawers.
The prepared elements of the load-bearing frame should be connected. The assembly method depends both on the material used for the strips a and b (board or laminated board), as per the intended wood surface finish. So, long screws and glue can be used for a coating with oil paint, for example wikol, while in the case of laminated blockboards, wooden pegs and wickerwork.
After gluing the frame, we check if the assembly is correct (right angles between the horizontal parts and the legs) and we leave it for at least 24 Hours.
Then we make a narrow partition c with a cross section of 2.4×4 cm and the casing of drawers made of boards with dimensions of 8×25,5 cm equipped with drawer guides – hardwood slats with a cross section of 1.5×1,0 cm glued to the drawer case. All these elements, after careful adjustment and surface treatment, are pasted into the inside of the table frame with wicker.
Two drawers with dimensions of 23x20x7 cm are glued together from plywood thickness 12-18 mm and we equip with bottoms made of varnished sawn board, the so-called hard, thickness 4 or 5 mm. Drawer dimensions are selected so, so that they can be inserted into the appropriate holes in the table frame without resistance, but also without much slack.
Table top consisting of two identical parts d1 and d2 with dimensions of 30×120 cm should be made either from properly glued thick boards, or laminated carpentry board. We connect both parts of the table top with hinges screwed to the wood so, so that after unfolding the table top between the boards me remains a gap. Then the table top is fixed to the table frame with dowels and glue. Let's pay attention that the part of the table top fixed permanently covers the drawers.
After folding the top, attach a board with dimensions of 11 to the underside of the movable part×36,8 cm, on it we will place and glue the support frame to the ironing board. The frame consists of elements g1 and g2 as well as h1 and h2 connected with glue and screws. Only on the ready support frame we put and fasten it (also for glue and for pegs) the correct ironing board (e) made of a blockboard covered with two layers of an old blanket on the top (or better a layer of felt thickness 10-15 mm) covered with thick, with a soft cotton fabric. This fabric should be folded underneath the ironing board, well stretched and nailed to the wood with textures with large cardboard pads. The texts should not be nailed very hard, because the board cover gets dirty quite quickly and you have to take it off and wash it from time to time.
Instead of covering the board with fabric, you can sew a suitable cover from it and pull it onto the board, and, if necessary, remove for washing.
The finished ironing table must be properly finished. It is best to use for this purpose enamel for wood in a matching color (or contrasting) for the colour of other kitchen appliances.
Ironing clothes on such a table will not be more pleasant than using a traditional board, but perhaps less tiring due to the stability of the table, and thus ironing boards.