Standing kitchen cabinet
Standing kitchen cabinet
Storing a vacuum cleaner with its equipment and other devices and cleaning products in the apartment is always a hassle.
The most convenient, of course, to keep the vacuum cleaner in a large, cardboard box, in which it was packed during transport from the factory to the store. Such a box has compartments for brushes, hose and extension pipes, but unfortunately, doesn't fit anywhere. In addition, the vacuum cleaner packed in the box requires meticulous assembly during each use. So often you just don't want to pull it out., to clean up a small area, easier to reach for a brush and a dumpster.
So if we care about it, so that mechanized household appliances are fully used, we must store it in a place that allows immediate use. A standing cabinet will help us in this, which can be placed not only in the kitchen, but for example in a sufficiently large hall or in the bathroom.
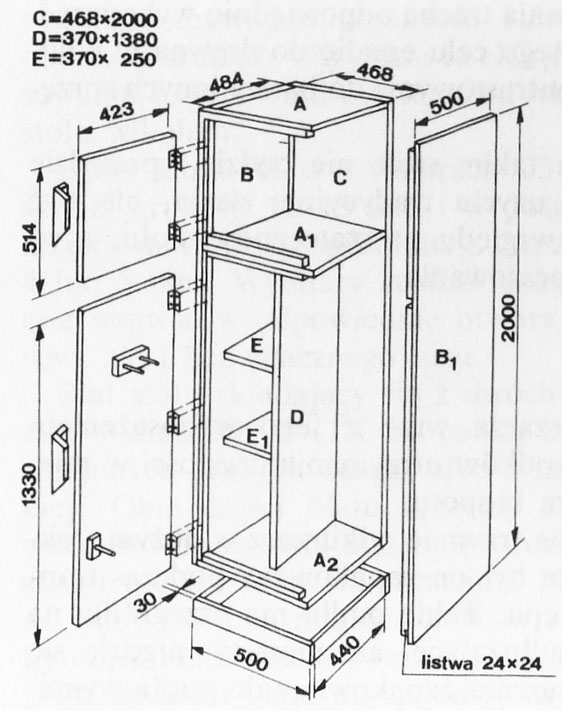
The cabinet shown in the picture is set up in the kitchen. Its external appearance, texture and color have been selected for other kitchen appliances. On the other hand, the size of the cabinet provides a comfortable room in it for both a vacuum cleaner with additional equipment, as well as all cleaning products. The upper part of the cabinet has a separate door, so you can store stocks of washing powders in it, soap, floor paste and many other items, the storage of which, as a rule, is cumbersome and troublesome. Cabinet dimensions: height 2 m, width 50 cm and depth 44 cm; Lower, the upper part has 1,33 m, and the upper 51,4 cm high.
The most suitable material for the walls of the cabinet is a carpentry board thickness 16 mm. If it is already factory veneered or laminated with unilam, preferably matt, then the outer surface of the cabinet will not require additional finishing. On the other hand, the raw plate, can simply be painted with oil paint in a color matched to the color of other kitchen appliances.
Work on the construction of the cabinet begins with cutting out the side walls (B and B1) with dimensions of 2×0,5 m. Then we cut out the remaining walls of the cabinet. All cutting edges should be sanded very thoroughly with fine-grained sandpaper, to achieve a perfectly smooth surface. Ready-made walls of the cabinet are connected with each other for wikol and wooden pegs of diameter 8 mm. Holes for dowels should be drilled with a drill with a diameter 7,5-7,8 mm yes, that they are slightly smaller than the diameter of the pins. Otherwise, the joints of the elements will not be strong enough despite the use of dowels and glue. The glued skeleton of the cabinet should be immobilized at least on 24 Hours, taking care of it, so that its walls are in a position perfectly perpendicular to each other.
Then we cut and attach to the skeleton of the partition A1, E, E1 and D, which at the same time stiffen the entire structure.
To finish the cabinet, we still have to make and fix the plinth from the thickness slats 30 mm, fixing edge strips with a cross section of 24×24 mm and execution of the upper door, with dimensions of 51.4×42,3 cm and lower with dimensions of 133×42,3 cm.
We connect the elements of the plinth together, at the contact, gluing them with wikol, and then on the dowels and glue we connect the plinth from the bottom to the skeleton of the cabinet.
Edge strips, very thoroughly sanded with sandpaper, we connect on dowels and glue so, so that their surface creates a recess for the door room with the edges of the side walls. In other words,, the outer surface of the door must, after closing the cabinet, coincide with the side edges of the walls.
We connect the door to the hinges by screwing them with screws to wood with dimensions Ø 3×25 mm. To the door inside the cabinet we screw hangers made of pieces of board and wooden rollers with a diameter 10-12 mm. Hangers will be used to hang brushes for a vacuum cleaner, hoses, etc..