Wooden cottage Anna
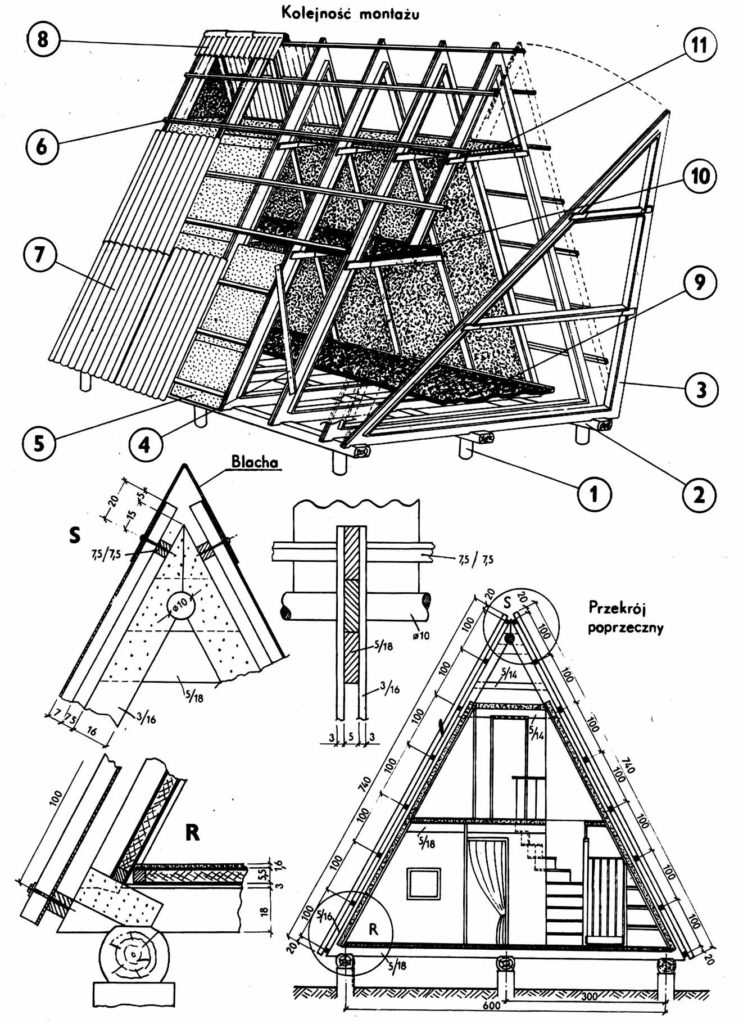
ASSEMBLY TECHNOLOGY
Foundation
On the selected construction plot, the floor plan of the house is measured and marked with pegs. In places for future piles, holes ∅25 cm are made with a manual drill to a minimum depth 80 cm. Such long pipes are inserted into the holes made, so that after concreting, the piles remain in the ground approx. 30 do 50 cm of pipe. The pipes will be of different lengths according to the slope of the terrain.
At the corners of the foundation, in the axes of the future piles, Auxiliary pegs are hammered into the ground and pulled between them (along the walls) thick steel wire through the pin head 1 do 1,5 mm. All pegs are brought to one level by means of a spirit level, tapping them according to the weight indications. The wire should be tightly stretched and in a permanent position, therefore, the pins are possibly secured by supporting or using lashings in the opposite direction to the tension.
After these activities are completed, the piles can be concreted. A dry concrete mix is poured inside the pipe; when the pipe is partially full, we pull it up like this, so that its top edge touches the taut wire. Some of the mixture in the pipe will then slide out into the hollow hole under the pipe. When lifting a pipe filled with a concrete mix, we use two makeshift levers; just use a pole for this (ticks) approx. 1,5 m, which is tied loosely with a string of thickness 10 do 12 mm. The pipe is wrapped twice with the other end of the string. The perch is tied like this, to create leverage. This is done by tying the poles approx. 30 cm from one end, at a height of approx. 20 cm above the ground; the longer end of the rod then serves as a lever arm. So that the end of the lever does not sink into the ground when the lever arm is lifted, a brick should be placed under it, stone or wooden block. Using such a lever, you can easily raise the pipe to the desired height. After this operation is performed, the position of the pipe is fixed by loosely driving two wedges between the pipe and the walls of the hollow bottom and untied the lever. Using a bricklayer's plumb line suspended on a string, it works, that the pipe is perfectly vertical and that its center is on the axis of the stretched wires. When the tube is properly seated, the free space around the pipe is covered with a concrete mix and compacted very carefully with a slat or other suitable compactor until it is completely bonded to the ground. Then the pipe is filled with concrete up to the height 20 cm below the top of the pipe. The mixture is gradually poured into and beaten continuously.
On the second or third day after concreting the piles, place stringers on them. The flat bar anchors should be previously screwed to the lengthwise 50 x 3 mm, approx. 50 cm, for longitudinal attachment to piles. The anchors must be split and open at the end. Pay attention to this, that the ends of the bolts do not extend below the free space, remaining above hardened concrete in the pipe, and that the bolts are always in the center of the pipes. Place the longitudinal beam with the bolted anchors on the pipes like this, that the anchors are inside the pipes. In this way, all three beams are prepared, and then fills the pipes with concrete to the edge. Minor unevenness in the levels of the concrete surface, formed during the setting of the pipes, can be later compensated by over-concreting.
Fabrication of the framework
From the front of the building, in a place with a sufficiently large area, an assembly platform made of boards is being nailed to pins embedded in the ground. On such a bridge, the exact shape of the frame is marked out, thus creating a template, by means of which the accuracy of the dimensions of the elements is achieved. On this template, rafters and tongs are installed to fix the frame structure, which, after its completion, can be comfortably carried by three people to the prepared foundation. When all the frames are ready, they are set up. In order to mesh the frames with stringers, cut them in stringers, in the places where the frames are seated, notches (these frameworks can be dispensed with, but the frames must then be nailed longitudinally to make the frame stronger). The first frame is then positioned in this way, that its top is rising, while holding down, so that the structure does not shift. When the top of the frame is raised 45 °, poles are already used to further raise the frame. The verticality of the frame setting is checked by means of a plumb line with a weight, tied to the top of the structure. After checking the verticality of the setting, the frame is supported with a rod or a rod, nailed with one end to the frame, the other to a peg embedded in the ground. These supports must be very carefully attached, so that during further manipulations, the placed structure would not overturn. A pole or a patch, holding the first frame - the top – must be placed outside the building, so that it does not interfere with the setting of the remaining frames. The second frame is then seated and secured, same as the previous one, round wood pole Ø10 cm, and in addition, the two frames are braced by nailing two boards to them from the outside, one on each side. Now a few logs can be placed loosely on the upper clamping clamps, thus obtaining a makeshift floor. Building the next framework and securing it is easier.
Wooden cottage Anna assembly
After all the frames are in place, the floorboards are laid and fastened. Then the wall panels are placed. This activity begins with the last field; first, the bottom plates are placed on both sides, then successive rows of top plates, doing so by hand up to the level of raising a hand, and the rows higher with patches. Always use three patches, so that in the event of a possible slippage of one of them, the other two ensure the safety of people under the currently installed panels. One field is thus completed; in relation to the remaining ones, the procedure is analogous. Fasten the boards to the side of the rafters with long nails 70 do 80 mm hammered every 30 cm.