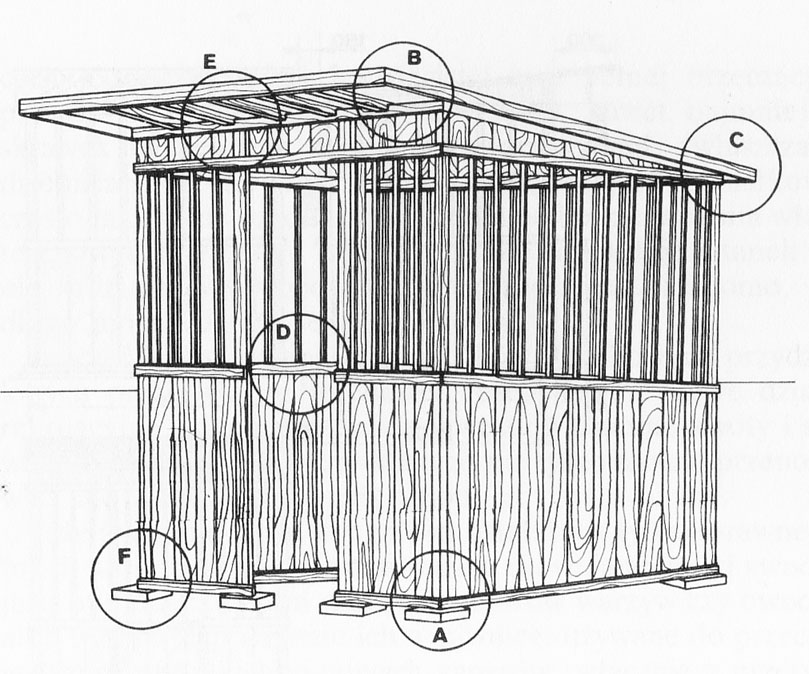
Garden gazebo
Nail the outer slats of the roof to the side walls, and put the remaining slats into the sockets and nail them with nails at an angle of 45 °, helping yourself with a cutter (preferably big and dull), that the nails extend to the end of their length.
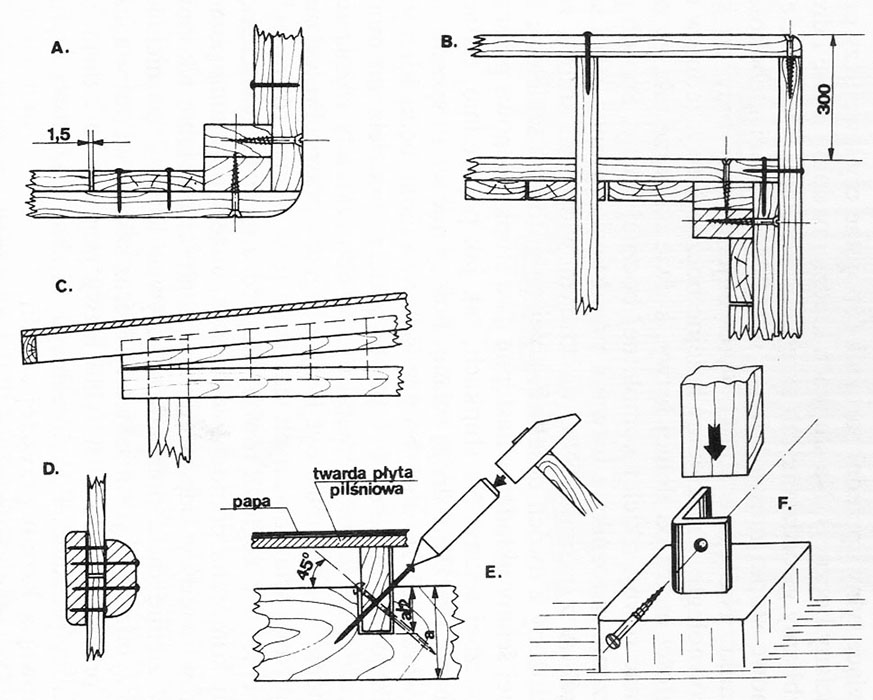
We finish the roof supporting structure by mounting transverse slats nailed to the roof slats (detail B, C). Finally, we cover the roof plane with a felted board, the so-called. very hard (thickness 5-6 mm), nailed to the slats, and put the tar paper on the board, nailing it with special nails, the so-called. papi, with large steel washers approx 20 mm.
Now we can fit and nail the boards that make up the walls of the gazebo. Their length should be this, that they overlap the entire width of the lower crossbar at the bottom, and from above, they reached half the width of the crossbar. The boards should be placed closely next to each other, in parallel, but yes, so that the edges of adjacent boards are approx 1,5 mm (detail A). This distance is necessary due to the increasing dimensions of the boards under the influence of moisture, which will get inside the wood, regardless of the quality of its security. There is no such varnish, which would one hundred percent protect the wood against moisture. If the boards were stacked without gaps, with each heavy rain, the gazebo walls would bend to form arches. In addition to the lower part of the walls, the upper space between the side strips should also be boarded in the same way as before.
Finally, cover the basic part of the side walls with square-section slats. The side of this square should be equal to the thickness of the boards used to trim the side walls of the gazebo.
The distance between the slats in the built gazebo is exactly 138 mm, which results from the equal division of the distance between the vertical posts of the load-bearing structure.
After nailing the sides, vertical slats, slats should be prepared to cover the gap between the boards and the slats (at the bottom and top of the slats). We will make it as per detail D., paying attention, so that the nails fastening the slats do not crack the wood – the nails must be long, and at the same time sharp and thin.
Before painting, the finished gazebo should be placed on concrete posts. For this purpose, we lift it on each side and prop it with bricks, stones or pieces of wood, yes, to obtain a perfect horizontal alignment of the edges of all four walls and that the lower edge of the gazebo is at a height of approx 5 cm above the ground. Now, under each bar, we dig a vertical square hole with a depth of approx 50 cm with a cross section of 15×15 cm.
Then we prepare six pieces of steel angle, one end of which will be provided with a hole approx 6 mm, and the other one slit and open to the sides. Put the prepared angles to the vertical posts of the gazebo, so that the bent ends of the angles are inside the dug holes. Connect the angles with long posts, steel screws with a diameter 5-6 mm, and the holes are poured with cement mortar mixed with coarse gravel (detail F). After a few days, the pads can be removed from under the bottom slats of the gazebo, and cover the entire wooden structure with several layers of oil paint.
Let's remember, that raw wood is always first painted with a layer of a special base oil paint. Only after the primer is completely dry, which, depending on air temperature and weather, takes from 6 do 48 hours, Paint the gazebo with topcoat oil paint (phthalic).
Inside the gazebo you can assemble a wooden bench, and a suitable table in front of it. Both of these items are best done by yourself, paint them with oil paint, and then dig into the ground, that they are stable and not wobble.