Bonding and forming of veneers – veneer panels
Bonding and forming of veneers – veneer panels
By bonding and forming veneers, we mean the process of shortening, narrowing and connecting the lobes in order to achieve the so-called. forms, i.e.. veneer sheet of specific dimensions for direct sticking to the board. The veneer is formed with a huge waste of its surface, reaching more than once 50%. The surface of the veneer in the bundle must therefore be twice as large as the dimensions of the lined wall. The length and width of the mat should be approx 3 cm greater than the dimensions of the glued element.
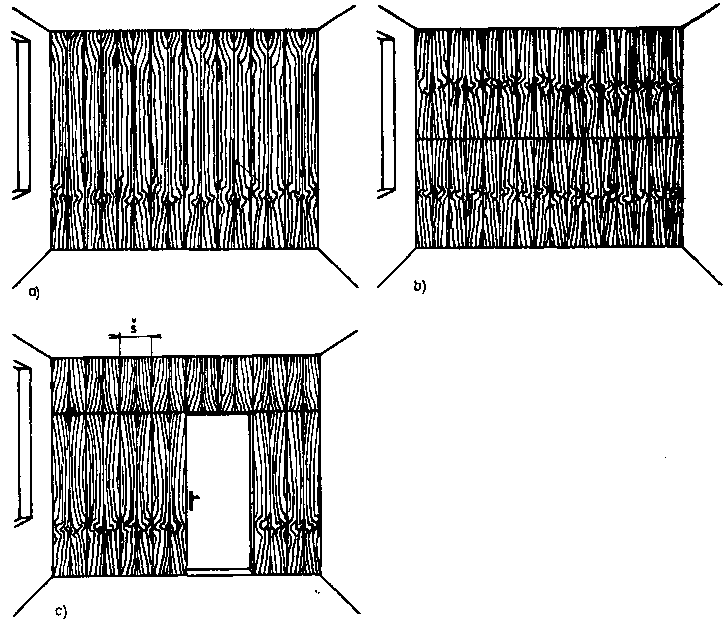
Drawing. Wall panels made of veneered wooden elements: a) to the full height of the room, b) divided in half, c) divided at the height of the door frame; s - element width
We choose symmetrical forming of veneer panels there, where the carpeting will dominate the room. The lining elements will therefore be very long, from the ceiling to the floor (Lynx. a), be halved (Lynx. b) or divided at the door height, i.e.. about 200 cm (Lynx. c). The most ethical of these methods is then, when the carpet covers the entire height of the wall. The acquisition of such a long veneer (above 250 cm) it is very difficult, therefore, there is nothing else to do but divide the surface into parts.
The number of veneer panels in a bundle depends on the number of trim elements. E.g. on the wall according to drawing c is necessary 16 lobes in a bundle, on the wall according to fig. b — 32 lobes in a bundle. A similar number, 32 flaps, needed for a wall according to fig. c.
When bonding the panels according to Fig. b and c must be symmetrical about the vertical and horizontal axes. From the first four panels, we get a set of two forms for the lower and upper element, which will be above each other (drawing).
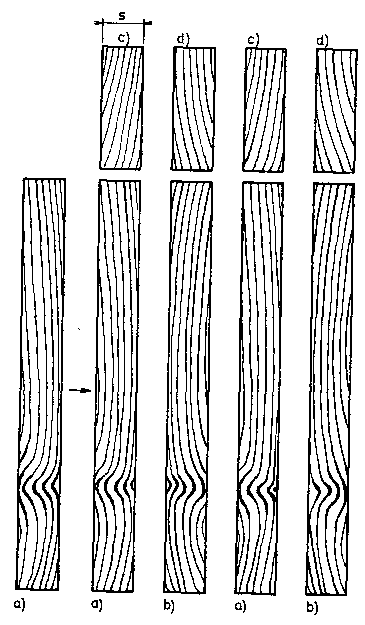
Drawing. Placing and rotating veneer forms when creating symmetrical patterns: a) original position of the mat in the bundle, b) form rotated around its longitudinal axis, c) form rotated around its shorter axis, d) form rotated around both axes; s - element width.
After selecting them, we need to mark them, so that there is no conversion. From the next four panels, we will compile the next two forms, etc..
Gluing whole sheets, without forming them into a symmetrical drawing it is easier, but it does not give such an end result. The drawing repeats in a mirror image, but only in width (drawing).
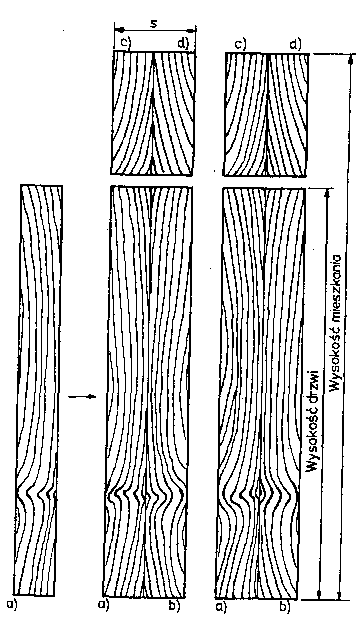
Drawing. Position and rotation of the veneer forms glued to the elements with the dimensions of the form (symmetry is formed after mounting the elements on the wall): a) positioning the mat in the bundle, b) form rotated around its longitudinal axis, c) form rotated around its shorter axis, d) form rotated around both axes; s - element width.
The sides of the lobes, to be bonded together are aligned on the edger. Repeatedly repeating the knife movements directed towards you, with gentle pressure, you can cut a few millimeters scrap. So that the side is even, the fence must also be equal. As a rule, we only trim two flaps, which will be bound together. An edger is also used to shorten the panels. During the shortening, the edge of the veneer may become detached. Therefore, the length of the flap must be shortened first, and only then its width. In this way, the detached section will be cut off in the longitudinal cut.
The dimensions of the form must be larger than the veneered element, usually 2-3 cm in width and as much in length. The veneered board should also be 1.0-1.5 cm larger than the finished element. In this way, the veneer form protrudes beyond the board by 0.5-1.0 cm. This is very important, because such a reserve prevents the plates from sticking in the press and possible mutual displacement of the plates against the veneer.
Bonding two, correctly turned flaps are made with the help of paper adhesive tape. The leading ends of the form often break, therefore it is also good to stick tape on them. When bonding two panels, they must adhere well to each other. The gap left between the panels is later visible after gluing, especially after varnishing. This is where the varnish will penetrate, which will collapse during drying. If, despite the careful bonding of the forms, there is a gap, after veneering and removing the paper tape, fill it with a wood putty with the appropriate shade of veneer.
Bonding the forms to the inner side of the veneer does not require such diligence. The slots and the selection of the drawing do not play a big role here.
by marcin